前言
Java后端技术点
StringUtils常用API
学习时笔记(Linux)
学习时笔记(Git)
学习时笔记(Docker)
学习时笔记(Vue2+3)
面试宝典
学习时笔记(JavaScript)
学习时笔记(JavaWeb)
1.初识前端
2.JavaScript-vue
3.Vue&Element
4.Maven-SpringBootWeb
5.SpringBootWeb请求响应
6.MySQL
7.MySQL查询
8.MySQL多表查询-MyBatis入门
9.MyBatis
10.springBoot-案例
11.springBoot-案例
12.springBootWeb 登录认证
13.SpringBoot AOP
14.SpringBoot原理
15.Maven进阶
学习时笔记(Java)
学习时笔记(Python)
1.Ajax
概念
- Asynchronous JavaScript And XML,异步的JavaScript和XML
作用
- 数据交换:通过Ajax可以给服务器发送请求,并获取服务器响应的数据
- 异步交互:可以在不重新加载整个页面的情况下,与服务器交换数据并更新部分网页的技术,如:搜索联想、用户名是否可用校验等等。
同步请求

- 异步请求

原生Ajax
- 准备数据地址:http://yapi.smart-xwork.cn/mock/169327/emp/list
- 创建XMLHttpRequest对象:用于和服务器交换数据
- 向服务器发送请求
- 获取服务器响应数据
<body>
    <input type="button" onclick="getData()" value="获取数据"/>
    <div id="data">

    </div>
</body>
    <script>
        function getData(){
            //1.创建XMLHttpRequest对象
            var XmlHttpRequest = new XMLHttpRequest();
            //2.发送异步请求
            XmlHttpRequest.open("get","http://yapi.smart-xwork.cn/mock/169327/emp/list");
            XmlHttpRequest.send();
            //3.获取服务器响应数据
            XmlHttpRequest.onreadystatechange = function(){
                if(XmlHttpRequest.readyState==4 && XmlHttpRequest.status==200){
                    document.getElementById("data").innerHTML = XmlHttpRequest.responseText;
                }
            }
        }
    </script>
1.1、Axios
概述
- 介绍:Axios 对原生的Ajax进行了封装,简化书写
- 官网:https://www.axios-http.cn/
Axios入门
- 引入Axios的文件
<script str="./js/axios-0.18.0.js"></script>- 使用Axios发送请求,并获取响应结果
<script src="./js/axios-0.18.0.js"></script>
<body>
    <input type="button" value="获取数据get" onclick="get()"/>
    <input type="button" value="删除数据post" onclick="post()"/>
</body>
    <script>
        function get(){
            axios({
                method:"get",
                url:"http://yapi.smart-xwork.cn/mock/169327/emp/list"
            }).then(result => {
                console.log(result.data);
            })
        }
        function post(){
            axios({
                method:"post",
                url:"http://yapi.smart-xwork.cn/mock/169327/emp/deleteById",
                data:"id=1"
            }).then(result => {
                console.log(result.data);
            })
        }
    </script>
请求方式别名(再次简化axios)[]括起来的参数可有可无
- axios.get(url,[config]);
- axios.delete(url,[config]);
- axios.post(url,[data],[config]);
- anxios.put(url,[data],[config]);
发送Get请求
axios.get("http://yapi.smart-xwork.cn/mock/169327/emp/list").then(result => {
    console.log(result.data);
})
发送post请求
axios.post("http://yapi.smart-xwork.cn/mock/169327/emp/deleteById","id=1").then(result => {
    console.log(result.data);
})
1.2、案例
- 准备的数据:http://yapi.smart-xwork.cn/mock/169327/emp/list
- 页面加载完成后,自动发送异步请求,加载数据,宣战展示

<script src="./js/vue.js"></script>
<script src="./js/axios-0.18.0.js"></script>
    <style>
        img{
            width:40px;
            height:30px;
        }
        td{
            text-align: center;
        }
    </style>
<body>
    <div id="app">
        <table border="1" cellspacing="0" width="70%" align="center">
            <tr>
                <th>编号</th>
                <th>姓名</th>
                <th>图像</th>
                <th>性别</th>
                <th>职位</th>
                <th>入职日期</th>
                <th>最后操作时间</th>
            </tr>
            <tr v-for="(user,index) in emps">
                <td></td>
                <td></td>
                <td>
                    <img v-bind:src="user.image"/>
                </td>
                <td>
                   <span v-if="user.gender==1">男</span>
                   <span v-else>女</span>
                </td>
                <td></td>
                <td></td>
                <td></td>
            </tr>
        </table>
    </div>

</body>
    <script>
        var mes;

        new Vue({
            el:"#app",
            data:{
                emps:[]
            },
            mounted() {
                axios.get("http://yapi.smart-xwork.cn/mock/169327/emp/list").then(result => {
                    this.emps = result.data.data;
                    console.log(this.emps);
                })
            },
        })
    </script>
2.前后端分离开发
2.1、介绍
- 前后端混合开发
- 沟通成本高
- 分工不明确
- 不便管理
- 不便维护扩展
- 前后端分离开发
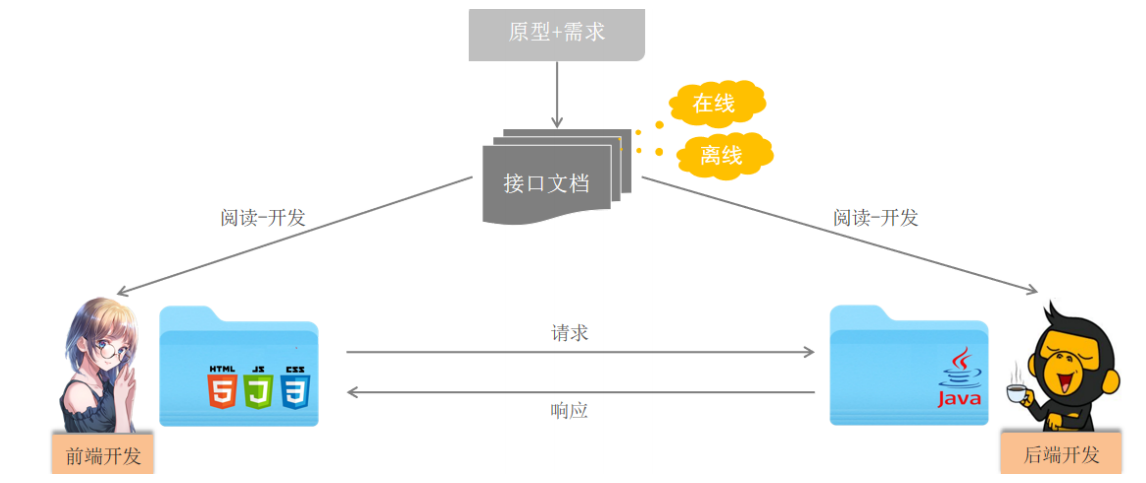
2.2、YAPI
介绍
- YApi是高效、易用、功能强大的 api 管理平台,旨在为开发、产品、测试人员提供更优雅的接口管理服务
添加项目

- 添加分类

- 添加接口

3.前端工程化
3.1、环境准备
- vue-cli
- 介绍:是Vue官方提供的一个脚手架,用于快速声称一个 Vue 的项目模板
- 功能
- 统一的目录结构
- 本地调试
- 热部署
- 单元测试
- 继承打包上线
- 依赖坏境:NodeJS
安装NodeJS
- 傻瓜式安装即可
验证NodeJS环境变量
- cmd —— node -v

配置npm的全局安装滤镜
- 使用管理员身份运行cmd——
npm config set prefix "NodeJS安装路径"切换npm的淘宝镜像
- 使用管理员身份运行cmd——
npm config set registry https://registry.npmmirror.com安装Vue-cli
- 使用管理员身份在运行cmd——
npm install -g @vue/cli
3.2、Vue项目简介
创建
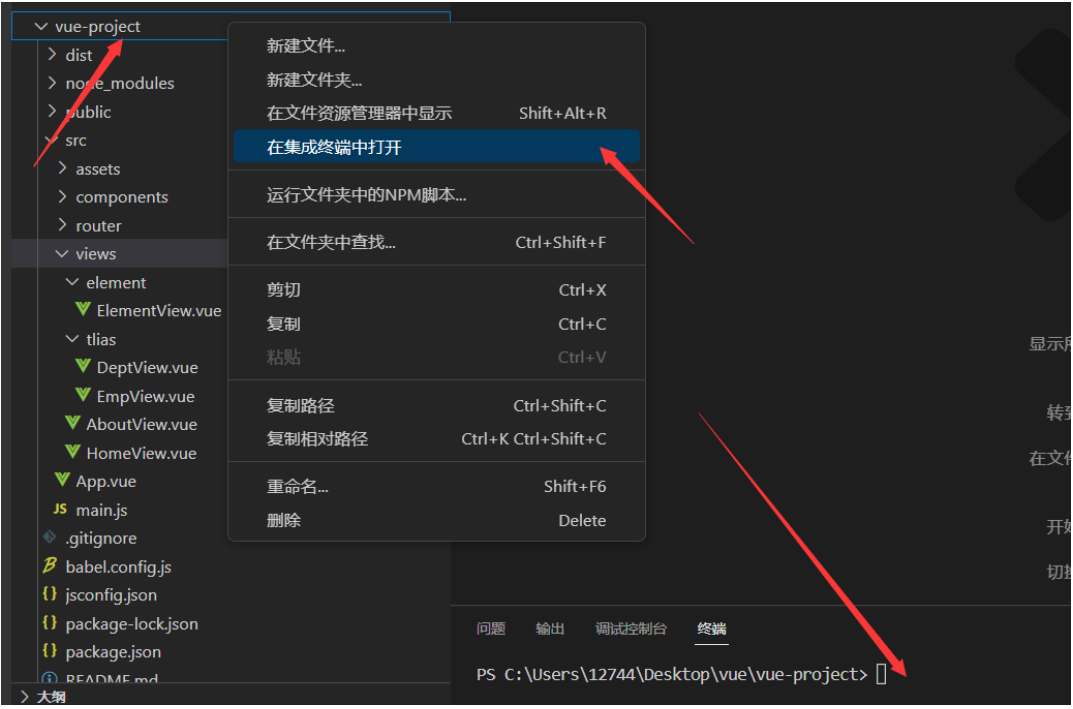
- cmd—— vue ui
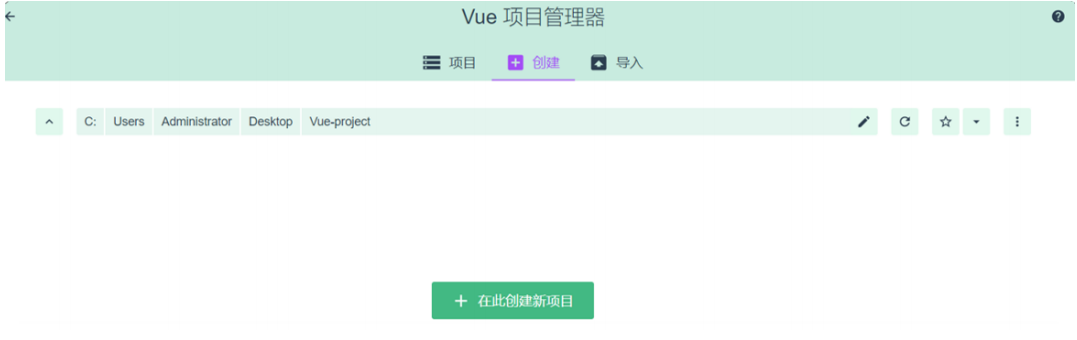
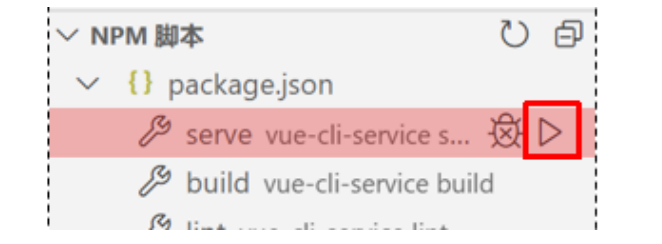
- 目录结构

- 项目启动
项目配置端口
- 在vue.config文件中
const { defineConfig } = require('@vue/cli-service')
module.exports = defineConfig({
  transpileDependencies: true,
  devServer:{
      port:0220
  }
})
3.3、Vue项目开发流程
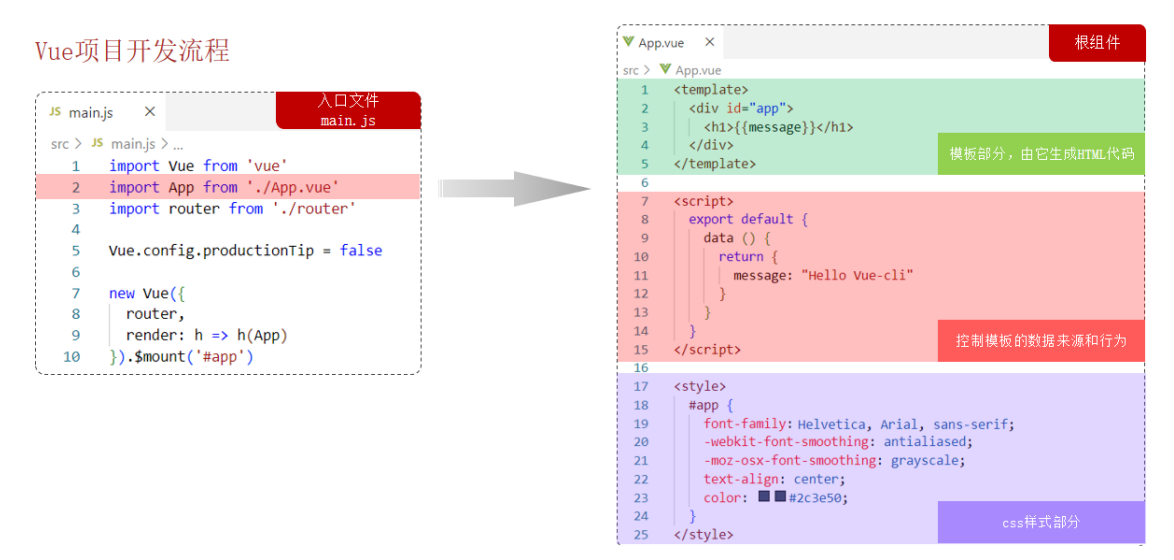
- Vue的组件文件以 .vue 结尾,每个组件由三个部分组成
- template:html
- script:JS
- style:CSS
4.Vue组件库Element
- Element:是饿了么团队研发,一套为开发者、设计师和产品精力准备的基于 Vue 2.0的桌面端组件库
- 组件:组成网页的部件,例:超链接、按钮、表格、表单等
- 官网:https://element.eleme.cn/#/zh-CNListener
4.1、快速入门
- 安装ElementUI组件库(在当前工程目录下),在命令行执行
npm install element-ui@2.15.3
- 引入ElementUI 组件库,在main.js中引入
import Vue from 'vue'
import App from './App.vue'
import router from './router'
//引入element ui组件
import ElementUI from 'element-ui';
import 'element-ui/lib/theme-chalk/index.css';

Vue.config.productionTip = false
//使用该组件
Vue.use(ElementUI);
- 访问官网,复制组件代码
4.2、常见组件
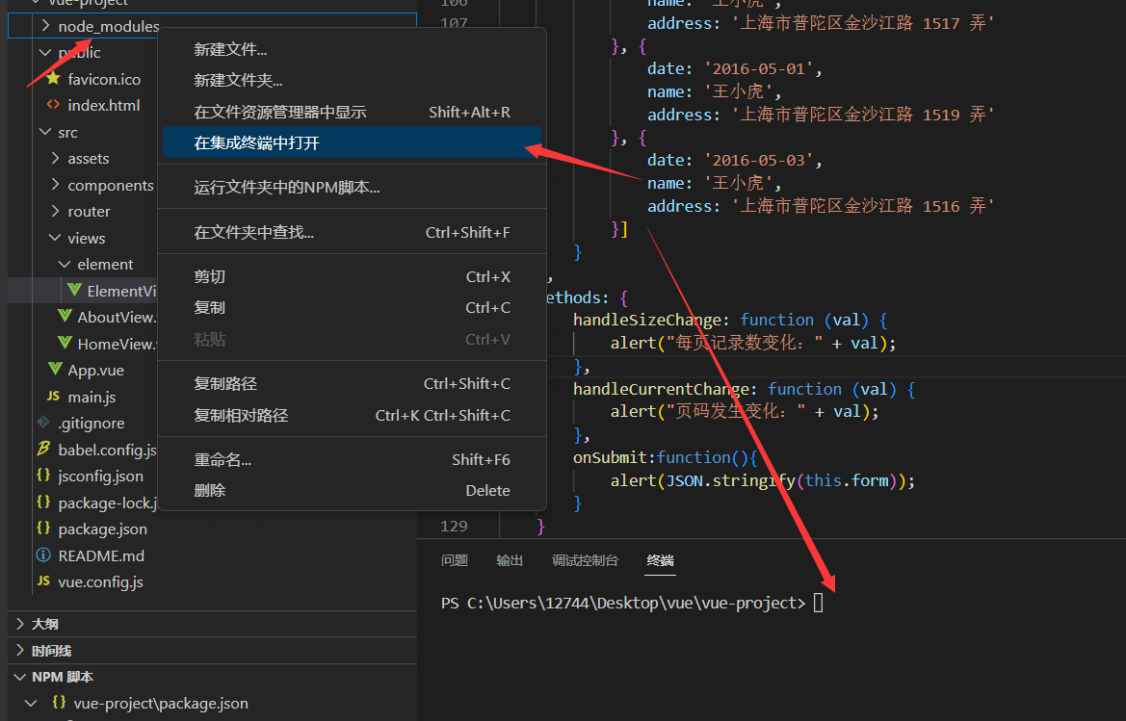
【在工程下views文件下创建文件element—创建ElementView.vue:来专门存放element组件的vue】
引用:在项目默认启动的App.vue中引用
【输入element-view时回车系统会自动引入】
表格
- Table表格:用于展示多条结构类似的数据,可对数据进行排序、筛选、对比或其他自定义操作
分页
- Pagination分页:当数据量过多时,使用分页分解数据

对话框
- Dialog对话框:在保留当前页面状态的情况下,告知用户并承载相关操作
表单
- Form表单:由输入框、选择器、单选框等,提交数据

<template>
<div>
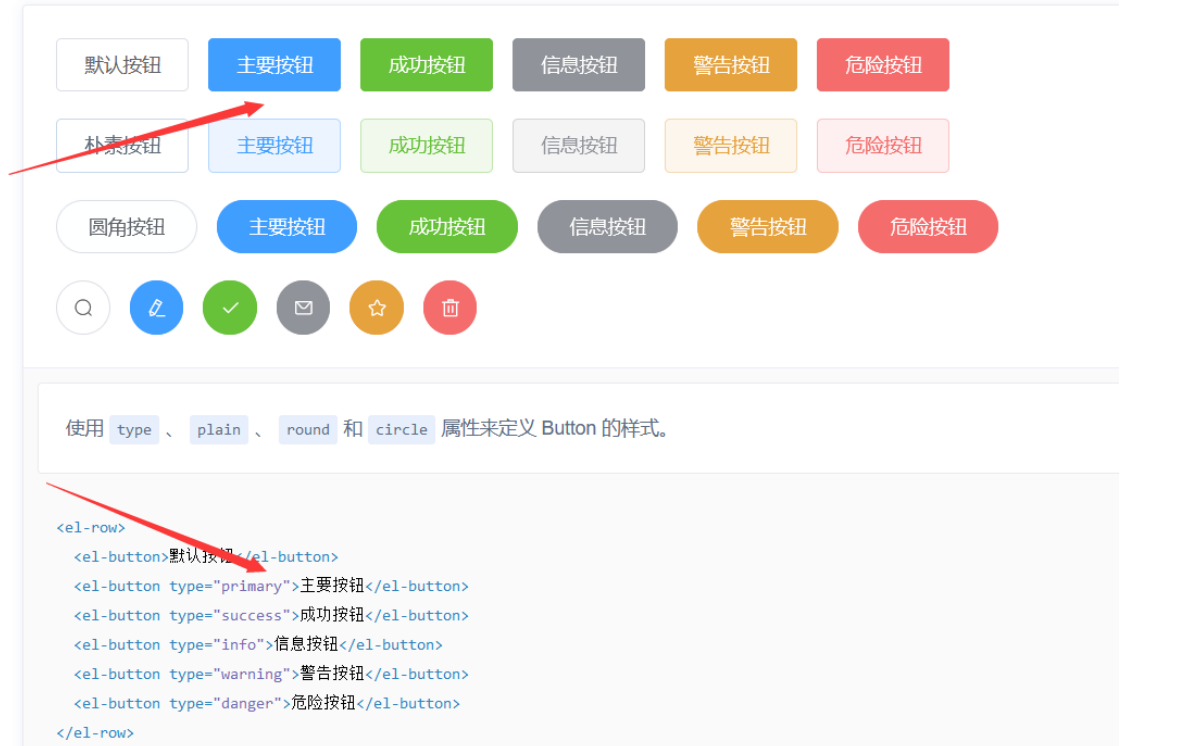
<!-- Button 按钮组件 -->
<el-row>
<el-button>默认按钮</el-button>
<el-button type="primary">主要按钮</el-button>
<el-button type="success">成功按钮</el-button>
<el-button type="info">信息按钮</el-button>
<el-button type="warning">警告按钮</el-button>
<el-button type="danger">危险按钮</el-button>
</el-row>
<br>
<!-- table 表格组件 -->
<el-table :data="tableData" style="width: 100%">
<el-table-column prop="date" label="日期" width="180">
</el-table-column>
<el-table-column prop="name" label="姓名" width="180">
</el-table-column>
<el-table-column prop="address" label="地址">
</el-table-column>
</el-table>
<!-- 分页 -->
<el-pagination background layout="sizes,prev, pager, next,jumper,total" @size-change="handleSizeChange"
@current-change="handleCurrentChange" :total="1000">
</el-pagination>
<br><br>
<!-- dialog对话框 -->
<el-button type="text" @click="dialogTableVisible = true">打开嵌套表格的 Dialog</el-button>
<el-dialog title="收货地址" :visible.sync="dialogTableVisible">
<el-table :data="gridData">
<el-table-column property="date" label="日期" width="150"></el-table-column>
<el-table-column property="name" label="姓名" width="200"></el-table-column>
<el-table-column property="address" label="地址"></el-table-column>
</el-table>
</el-dialog>
<br>
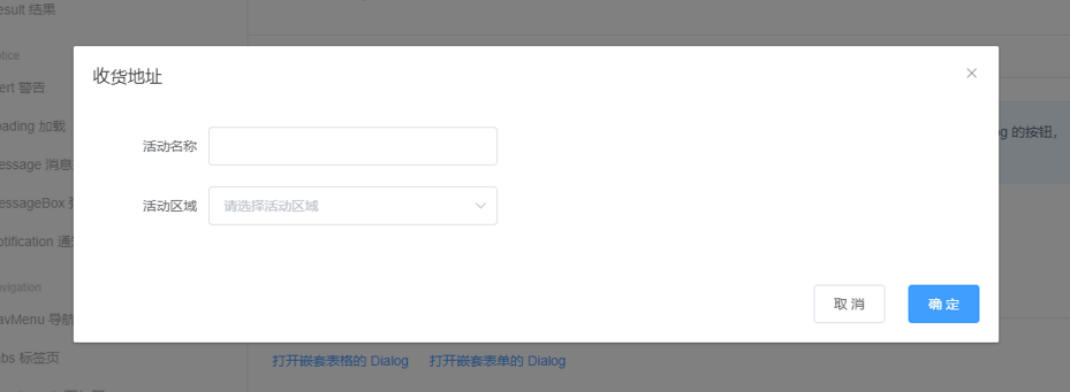
<!-- 对话框弹出form表单 -->
<el-button type="text" @click="dialogFormVisible = true">打开嵌套表单的 Dialog</el-button>
<el-dialog title="Form表单" :visible.sync="dialogFormVisible">
<el-form ref="form" :model="form" label-width="80px">
<el-form-item label="活动名称">
<el-input v-model="form.name"></el-input>
</el-form-item>
<el-form-item label="活动区域">
<el-select v-model="form.region" placeholder="请选择活动区域">
<el-option label="区域一" value="shanghai"></el-option>
<el-option label="区域二" value="beijing"></el-option>
</el-select>
</el-form-item>
<el-form-item label="活动时间">
<el-col :span="11">
<el-date-picker type="date" placeholder="选择日期" v-model="form.date1"
style="width: 100%;"></el-date-picker>
</el-col>
<el-col class="line" :span="2">-</el-col>
<el-col :span="11">
<el-time-picker placeholder="选择时间" v-model="form.date2" style="width: 100%;"></el-time-picker>
</el-col>
</el-form-item>
<el-form-item>
<el-button type="primary" @click="onSubmit">立即创建</el-button>
<el-button>取消</el-button>
</el-form-item>
</el-form>
</el-dialog>
</div>
</template>
<script>
export default {
data() {
return {
form: {
name: '',
region: '',
date1: '',
date2: ''
},
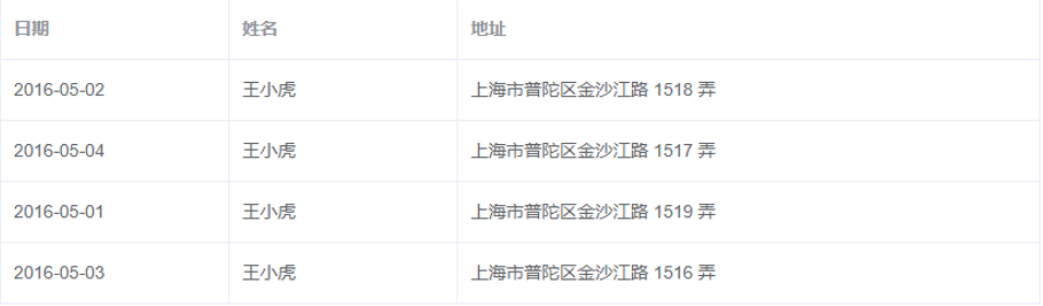
gridData: [{
date: '2016-05-02',
name: '王小虎',
address: '上海市普陀区金沙江路 1518 弄'
}, {
date: '2016-05-04',
name: '王小虎',
address: '上海市普陀区金沙江路 1518 弄'
}, {
date: '2016-05-01',
name: '王小虎',
address: '上海市普陀区金沙江路 1518 弄'
}, {
date: '2016-05-03',
name: '王小虎',
address: '上海市普陀区金沙江路 1518 弄'
}],
dialogTableVisible: false,
dialogFormVisible: false,
tableData: [{
date: '2016-05-02',
name: '王小虎',
address: '上海市普陀区金沙江路 1518 弄'
}, {
date: '2016-05-04',
name: '王小虎',
address: '上海市普陀区金沙江路 1517 弄'
}, {
date: '2016-05-01',
name: '王小虎',
address: '上海市普陀区金沙江路 1519 弄'
}, {
date: '2016-05-03',
name: '王小虎',
address: '上海市普陀区金沙江路 1516 弄'
}]
}
},
methods: {
handleSizeChange: function (val) {
alert("每页记录数变化:" + val);
},
handleCurrentChange: function (val) {
alert("页码发生变化:" + val);
},
onSubmit:function(){
alert(JSON.stringify(this.form));
}
}
}
</script>
<style></style>
【每个组件中的属性在官方文档中该组件最下面都会有展示,使用时注意给相应属性,声明需要的变量,函数方法】
4.3、案例
- 根据页面原型完成员工管理页面开发,并通过Axios完成数据异步加载
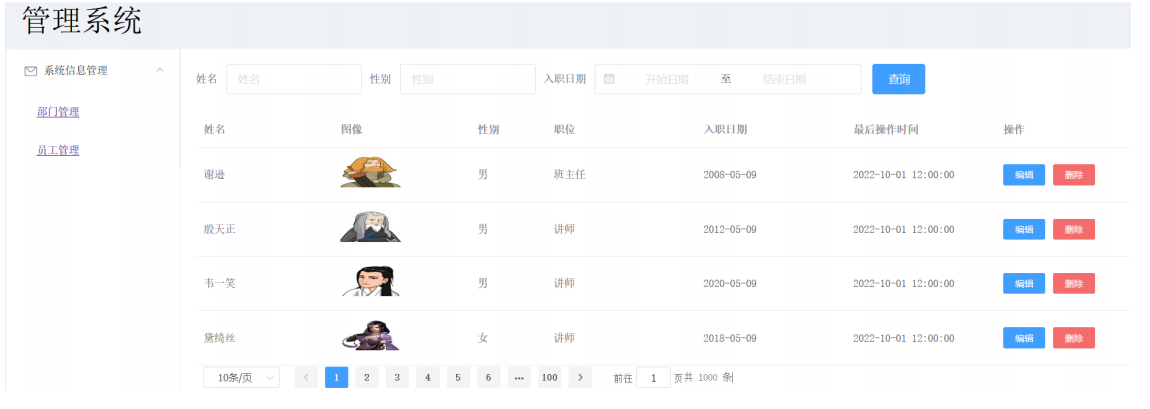
步骤
- 创建页面,完成页面的整体布局规划
- 布局中各个部分的组件实现
- 列表数据的异步加载,并渲染展示
Vue项目中使用Axios
- 在项目目录下安装axios:npm install axios
需要使用时,导入axios:imort axios from 'axios';
<script>
import axios from 'axios'
</script>
<template>
    <div>
        <el-container style="height: 700px; border: 1px solid #eee">
            <el-header style="text-align: left; font-size: 40px;background-color: rgb(238, 241, 246)">管理系统</el-header>
            <el-container>
                <el-aside width="230px" style="border: 1px solid #eee">
                    <el-menu :default-openeds="['1', '3']">
                        <el-submenu index="1">
                            <template slot="title"><i class="el-icon-message"></i>系统信息管理</template>
                            <el-menu-item index="1-1">
                                部门管理
                            </el-menu-item>
                            <el-menu-item index="1-2">
                                员工管理
                            </el-menu-item>
                        </el-submenu>
                    </el-menu>
                </el-aside>
                <el-main>
                    <el-form :inline="true" :model="formInline" class="demo-form-inline">
                        <el-form-item label="姓名">
                            <el-input v-model="formInline.name" placeholder="姓名"></el-input>
                        </el-form-item>
                        <el-form-item label="性别">
                            <el-input v-model="formInline.sex" placeholder="性别"></el-input>
                        </el-form-item>
                        <el-form-item label="入职日期">
                            <el-date-picker v-model="formInline.date" type="daterange" range-separator="至"
                                start-placeholder="开始日期" end-placeholder="结束日期">
                            </el-date-picker>
                        </el-form-item>
                        <el-form-item>
                            <el-button type="primary" @click="onSubmit" style="margin-left:5px;">查询</el-button>
                        </el-form-item>
                    </el-form>
                    <el-table :data="tableData" style="width: 100%">
                        <el-table-column prop="name" label="姓名" width="180">

                        </el-table-column>
                        <el-table-column label="图像" width="180">
                            <template slot-scope="scope">
                                <img :src="scope.row.image" style="width:80px;height:40px"/>
                            </template>
                        </el-table-column>
                        <el-table-column width="100px" label="性别">
                          <!-- <template slot-scope="scope"> -->
                          <!--      -->
                          <!-- </template> -->
                        </el-table-column>
                        <el-table-column prop="job" label="职位"></el-table-column>
                        <el-table-column prop="entrydate" label="入职日期"></el-table-column>
                        <el-table-column prop="updatetime" label="最后操作时间">

                        </el-table-column>
                        <el-table-column label="操作">
                            <el-button type="primary" size="mini">编辑</el-button>
                            <el-button type="danger" size="mini">删除</el-button>
                        </el-table-column>
                    </el-table>
                    <el-pagination background layout="sizes,prev, pager, next,jumper,total" @size-change="handleSizeChange"
                        @current-change="handleCurrentChange" :total="1000">
                    </el-pagination>
                </el-main>
            </el-container>
        </el-container>
    </div>
</template>

<script>
import axios from 'axios'
export default {
    data() {
        return {
            formInline: {
                name: '',
                sex: '',
                date: []
            },
            tableData: []
        }
    },
    methods: {
        handleSizeChange: function (val) {
            alert("每页记录数变化:" + val);
        },
        handleCurrentChange: function (val) {
            alert("页码发生变化:" + val);
        },
        onSubmit() {
            console.log('submit!');
        }
    },
    mounted() {
        axios.get("http://yapi.smart-xwork.cn/mock/169327/emp/list").then(result => {
            this.tableData = result.data.data;
            console.log(result.data.data);
        })
    }
}
</script>

<style></style>
在渲染表格时遇到问题
- 因为使用的是element组件通过属性来传递的数据
- 可以通过template slot-scope="scope"来获取当前行对象
<el-table-column label="图像" width="180">
    <template slot-scope="scope">
        <img :src="scope.row.image" style="width:80px;height:40px"/>
    </template>
</el-table-column>
<el-table-column width="100px" label="性别">
    <template slot-scope="scope">

    </template>
</el-table-column>
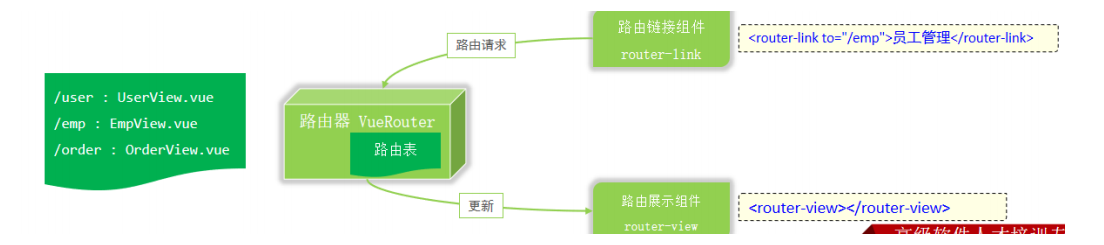
5.Vue路由
Vue Router
安装(创建Vue项目时已经选择)
- 也可以通过当前工程下载:npm install vue-router@3.5.1
定义路由
- 引入【main.js】
import Vue from 'vue' import App from './App.vue' //引入router import router from './router' //引入element ui组件 import ElementUI from 'element-ui'; import 'element-ui/lib/theme-chalk/index.css'; Vue.config.productionTip = false //使用该组件 Vue.use(ElementUI); new Vue({ //使用 router, render: h => h(App) }).$mount('#app')- 使用【router下的index.js】
import Vue from 'vue'
import VueRouter from 'vue-router'

Vue.use(VueRouter)

const routes = [
  {
    path: '/emp',
    name: 'emp',
    component: () => import('../views/tlias/EmpView.vue')
  },
  {
    path: '/dept',
    name: 'dept',
    component: () => import('../views/tlias/DeptView.vue')
  }
]
通过Vue的路由VueRouter完成左侧菜单栏点击切换效果
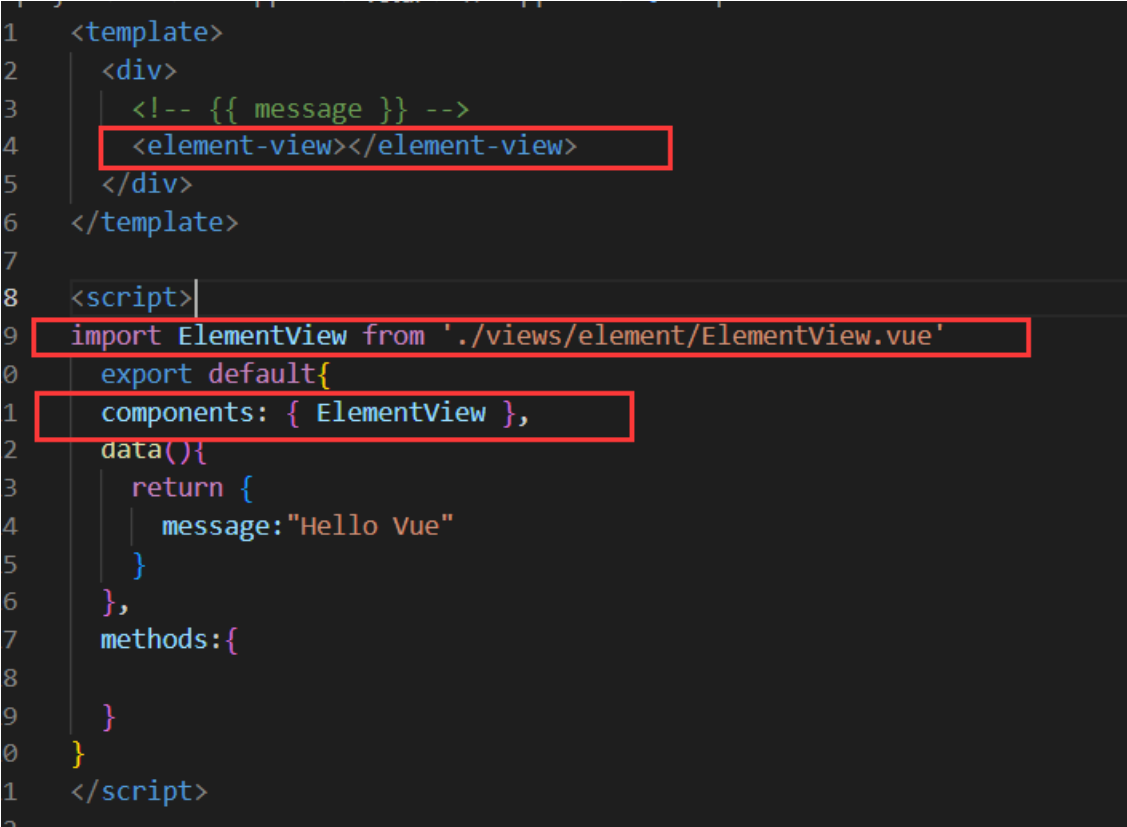
<template>
  <div>
    <!--  -->
    <!-- <element-view></element-view> -->
    <!-- <emp-view></emp-view> -->
    //渲染视图的部分
    <router-view></router-view>
  </div>
</template>

<script>
// import EmpView from './views/tlias/EmpView.vue'
// import ElementView from './views/element/ElementView.vue'
  export default{
  // components: { EmpView },
  // components: { ElementView },
  data(){
    return {
      message:"Hello Vue"
    }
  },
  methods:{

  }
}
</script>
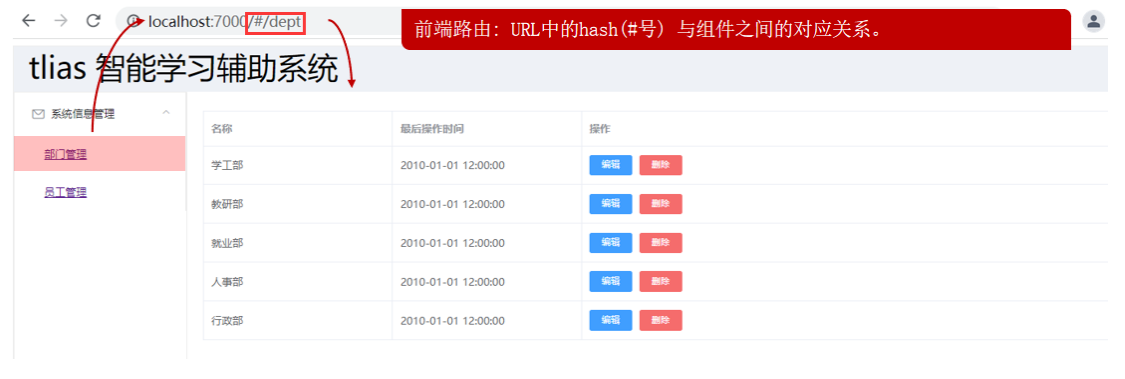
- EmpView.vue
<el-menu-item index="1-1">
    <router-link to="/dept">部门管理</router-link>
</el-menu-item>
<el-menu-item index="1-2">
    <router-link to="/emp">员工管理</router-link>
</el-menu-item>
遇到重新加载以后,默认的访问为localhost:/# 并没有跳转到emp或dept
- 解决:在router下的index.js中
const routes = [
    {
        //redirect:重定向
        path: '/',
        redirect: "/dept"
      },
      {
        path: '/emp',
        name: 'emp',
        component: () => import('../views/tlias/EmpView.vue')
      },
      {
        path: '/dept',
        name: 'dept',
        component: () => import('../views/tlias/DeptView.vue')
      }
]
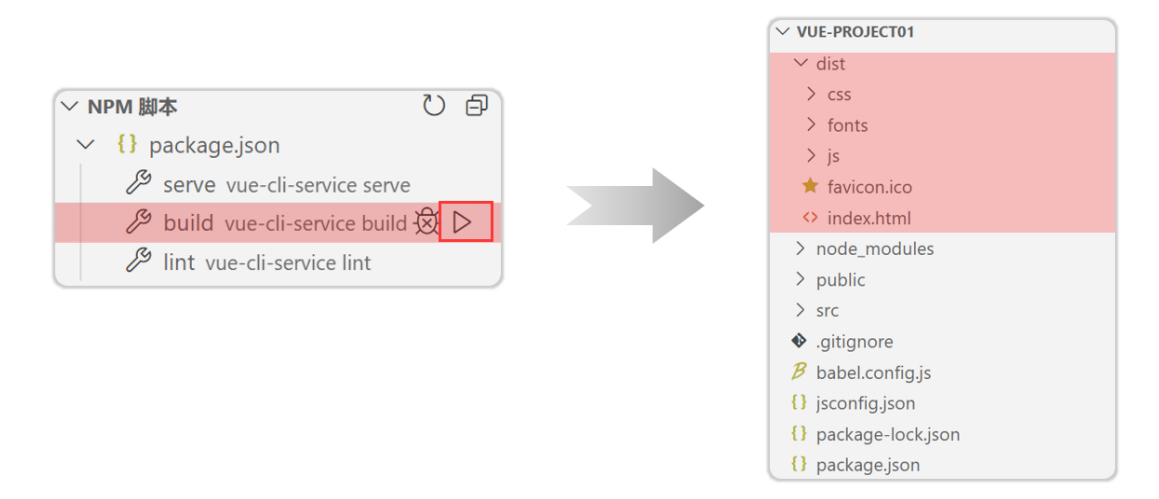
6.打包部署
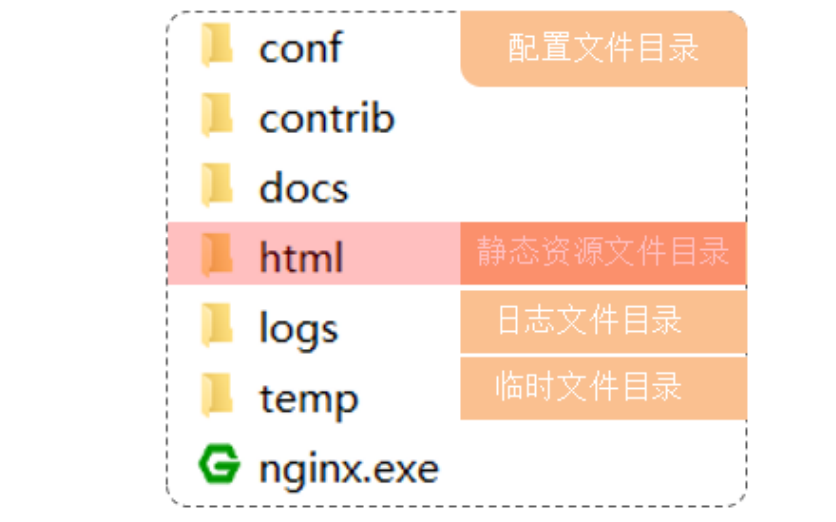
- Nginx
- 是一款轻量级的Web服务器/反向代理服务器及电子邮件(IMAP/POP3)代理服务器。特点是占有内存少,并发能力强,在各大型互联网公司都有非常广泛的使用
- 官网:https://nginx.org/
- 部署
- 将打包好的 dist 目录下的文件,复制到nginx安装目录和html目录下
- 启动
- 双击nginx.exe文件即可,Nginx服务器默认占用80端口号
【Nginx默认占用80端口号,如果已经被占用,可以在nginx.conf中修改端口号】
命令行:netstat -ano | findStr 80:可以查看是哪个程序在使用80端口,看到ID后可以从后端服务器来查询